Applying a delta means that DE merges the changes provided in any given delta file, to a third file.
The image below shows an example of necessary Action Parameters to apply a delta:

Action Parameters
| Mode: | In this example the DE is asked to work on a Single File. |
|---|---|
| Original: | Not needed to apply a delta. |
| Revision 1: | Not needed to apply a delta. |
| Revision 2: | The file into which you want to merge the delta. If you ran in Folder Mode this would be a folder. |
| Output: | The merged file. If you ran in Folder Mode this would be a folder. |
| Delta: | This is the file that contains the delta. If you ran in Folder Mode this would be a folder. |
| Notes: | Not used for applying a delta. |
After setting up the Action Parameters you click apply:
![]()
Apply Button
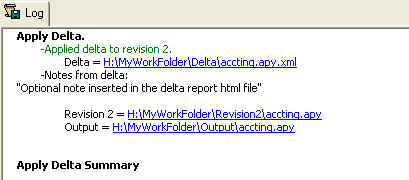
The log window will display the result of the process:

The Log Window
Before you get to the log window however, the Delta Engine will check how it has been configured to handle successful merges as well as situations where Delta Engine could not automatically merge all changes.
A successful merge can display the Output file in the "Merged Output" window, the "Manual Mode" window or you can choose not to display it at all. Per default the "Merged Output" window described in the next chapter is used.
If DE cannot apply all changes in a Delta, DE will per default open the "Manual Mode" window to allow the user to manually make the remaining changes. You can however turn off this behavior.
See chapter IFS Delta Engine Properties to learn about DE configuration.
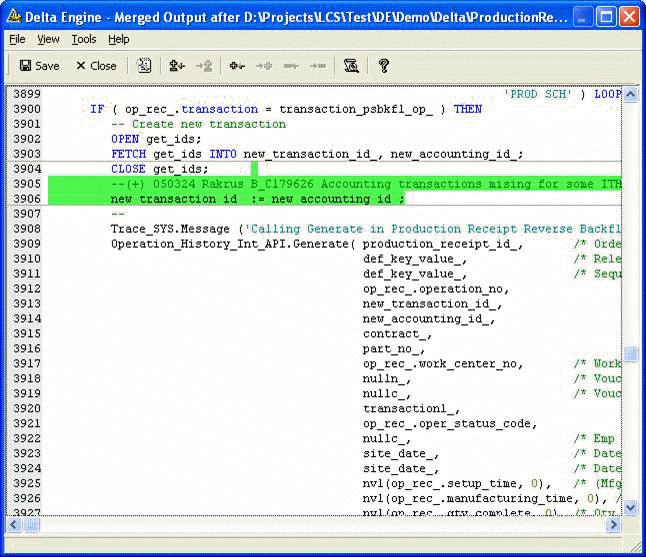
The Merged Output window can be used to review the Output of a successful delta application.

The Merged Output window
In the Merged Output window, you have action/buttons available for quickly finding either the next, or previous, addition or deletion, and to search for specific text.
Find: Finds the specified text in a window
Previous/Next: Moves to the previous/Next addition or deletion.
Previous Addition/Next Addition: Moves to the previous/Next addition.
Previous Deletion/Next Deletion: Moves to the previous/Next deletion.
Observe the red strikethrough to indicate deletion, and the green underline color to indicate an addition. These effects are configurable, per IFS Delta Engine Properties.
Use Save to accept the merge, and create the output file.
Use Close to cancel the merge, and stop the output file from being created.
The Manual Mode Output window can be used to review the Output of a successful delta application or manually handle changes that could not be automatically merged.
The application of deltas is context based. This means that a delta extracted from one context must be applied in exactly the same context in the file to which it is merged. If a delta was fetched from "Procedure Get_Description" then it must be applied in "Procedure Get_Description" as well. If DE can't locate the correct context, the delta will not be applied automatically.

Manual Mode Window
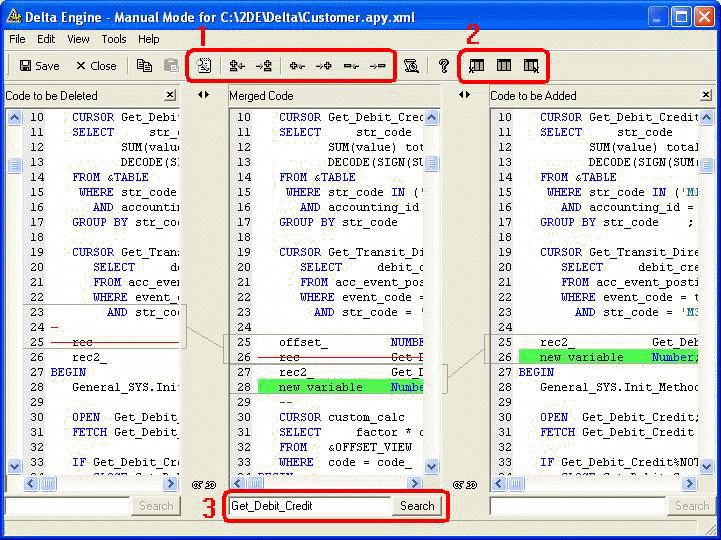
Manual Mode displays three windows representing "Code to be Deleted", "Merged Code", and "Code to be Added".
The middle "Merged Code" window displays the Revision 2 file, plus all statements that could be merged automatically. You can see merged code as red strikethrough and green underlines in the Merged Code window, just as in the Merged Output window in the prior chapter. The merged code blocks in this window has links to the corresponding code blocks in the Code to be Added / Code to be deleted windows. You can also edit the code in this window
The left side "Code to be Deleted" displays the Original File with red strikethrough for code that has been deleted between Original and Revision 1. This code could not be removed automatically, and must be removed manually in the Merged Code window. Do this by click-dragging the code to be deleted and drop it on the corresponding statement in the Merged Code window. The code that has been automatically merged is highlighted and has links to the corresponding code block in the Merged output window.
The right side "Code to be Added" displays the Revision 1 file with green underline for code that has been added between Original and Revision 1. This code could not be added automatically, and must be added manually in the Merged Code window. Do this by click-dragging the code to be added and drop it in the correct context in the Merged Code window. The code that has been automatically merged is highlighted and has links to the corresponding code block in the Merged output window.
Actions/buttons are available to quickly find next and previous change, addition and deletion, or to search for specific text. (See 1 in the image above). Observe that the buttons work in the currently active window.
You can hide the left or the right side window so that more of the code in the remaining windows becomes visible. (See image 2 in the image above). Additionally, each of the three windows can be resized using the Left-Right symbols.
There are search boxes at the bottom of all three windows which you can use to do a search in the corresponding window. (See 3 in the image above)
Using the chain symbols you can lock windows to make them scroll at the same time.
The Right Mouse action "Synchronize by line text" will synchronize all three windows on the text of the caret line in the currently focused window. This action is available only when at least one window is not linked using the chain buttons at the bottom.
The Right Mouse action "Show Path up to top level" displays the outline structure of the document. You can copy text from this dialog box and paste in the search boxes at the bottom or the search dialog, to find the exact location in the file that you are looking for
When you are dragging and dropping statements to be deleted it can sometimes be mildly awkward to select the exact statements to be replaced. Use the shift-button on your keyboard with the mouse to help you select more than one line of code in the Merged Code window.
When you are dragging and dropping code from the Code to be added and Code to be deleted window, make sure that the code is highlighted correctly in the Merged code window.
Use Save to accept the merge and create the output file.
Use Close to cancel the merge and stop the output file from being created.
When you work in manual mode you must be very careful not to unintentionally remove changes in Revision 2. Study this example:

In this example the Original statement was: IF X_ > 10 THEN
A patch from R&D (The Revision 1 file) has changed this to: IF X_ > 20
THEN
A customization you did (The Revision 2 file) had customized this to:
IF X_ > 30 THEN
The DeltaEngine cannot in this situation decide whether 20 or 30 is correct. YOU MUST DECIDE THIS.
If 30 is the value you want, then this delta does not need to be merged. When you choose to leave a delta unmerged you right clicking on its text and say "Ignore Delta". DeltaEngine will otherwise see it as an unhandled delta and report it in the log when you finish Manual Mode.
If 20 is the value you want you should manually apply both the code to be deleted and code to be added.