IFS Notify Me tells you when there are new business events requiring your attention and action. The notifications are shown in a single unified list where you can view details and take action such as Approving or Authorizing immediately. Additional features include possibility to Follow Up at a later time up by creating a reminder task in IFS Applications and calling or e-mailing the relevant contact person directly from within IFS Notify Me.
In its current version IFS Notify Me will notify you about new absence requests, purchase requisitions, purchase orders, supplier invoices, travel expenses and time reports waiting for your authorization. It also lets you create your own configured notifications.
IFS Notify Me can be used in Try Me mode with demo data without requiring a log on or network connection. Use of IFS Notify Me connected to your company’s IFS Applications installation(s) requires that your company has a valid IFS Touch Apps subscription or Touch Apps Server installation.
Redirect URI for IFS Notify Me are
Please refer Authentication configurations for the exact steps that must be followed to setup the redirect URI on the identity provider that is being used in your system.
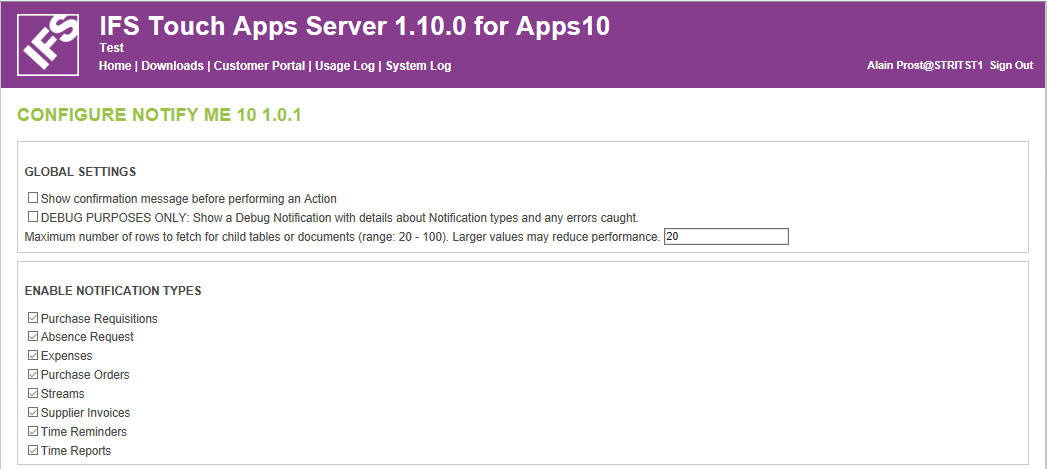
IFS Notify Me has a set of configuration settings that can be changed by logging into the IFS Touch Apps Server, Customer Portal. These will be necessary for altering how the app behaves.
First of all there are a set of different notification types can be enabled/disabled for the Notify Me app. Furthermore, some of the notifications have further configurations such as which fields should be displayed, in which state to fetch notifications, time range format etc.

In Global Settings you can set the following:
The following notification types can be configured in the Touch Apps Server, for each notification it is also stated further configuration that can be made:
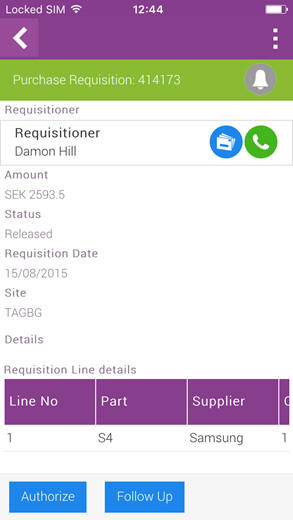
Purpose: Authorize Purchase requisitions and/or create a Task to follow up the Purchase requisitions later on.
Optional configurable data:
Documents attached to the PR will be displayed as icons, by clicking on an icon the document will be downloaded and displayed if the device can handle the document type.
Actions: Authorize and Follow Up.
Purpose: Approve or Reject Absence Requests
Optional configurable data:

Actions: Approve and Reject. The action Reject will display a list of rejection reasons, by selecting one of these the Absence request will be rejected, you can also Cancel. If there is only one rejection reason the list will not displayed.
Purpose: Authorize expenses and/or create a Task to follow up the expenses later on.
Optional configurable data:
Only Expenses in state Confirmed or Approved will be fetched depending on the configuration.

Actions: Authorize and Follow Up.
Purpose: Authorize Purchase orders and/or create a Task to follow up the Purchase orders later on.
Optional configurable data:
Show Changed Order Information
Purchase Orders can be configured to show changed order information or not.

Actions: Authorize and Follow Up.
Purpose: Display your Streams notifications
Optional configurable data:
Generate notifications for Streams items created in the last many days
Streams can be configured to generate notifications for a number of days in
the past.

Actions: Archive that will mark the Streams notification as read.
Purpose: Authorize Supplier invoices or reject them using the action “Wrong Authorizer “and/or create a Task to follow up the Supplier invoices later on.
Optional configurable data:

Actions: Authorize, Wrong Authorizer and Follow Up.
Purpose: Display Time reminders
Optional configurable data:
Generate Notifications for time reminder after this number of days have
passed
The number of days after the time reporting period has ended that the
reminder should be sent out can be configured in number of days.
Time Reminders uses the Time Management settings.
Only Time Reminders newer than 3 months are fetched.


Actions: There are no actions, it is a reminder.
Purpose: Authorize Time reports
Optional data configurable data:
Time Reports also uses the Time Management settings.
Only Time Reports newer than 3 months are fetched.

Actions: Authorize
You can define own notifications in IFS Notify Me.

When pressing Add, you will come to a new page where you can define a new notification.
See detailed instruction how to create a configured notification with tips and tricks on this page, Create Configured Notification.
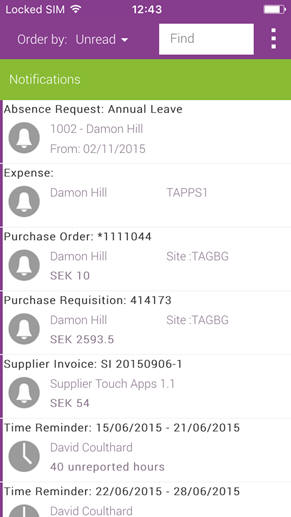
After having logged into the Notify Me app it will start fetching configuration data, notifications etc. When this is ready a list with the notifications is displayed. On a device with a large display the list will be displayed on the left side and on smaller devices only the list is displayed.

The notification can be ordered by:
The order can be reversed, for example notifications in date order will toggle between ascending and descending date order for each Order by Date.
New notifications will have the notification Id displayed in bold and a purple teaser on the left side.
In the Find field you can search for any data in all the notifications. For example if you search for a Site named “Site 1” all notifications that contains this will be displayed. The search is case insensitive meaning that “Site 1” will display the same result “site 1”. The search is not limited to a filed with the name Site as in the example but to all fields with the value “site 1”
In the upper right corner there is a menu with the following functions:
When the app is started from the notification the new notifications are displayed the rest are hidden. To see all notifications there is a button “Display all” that will include the new notifications in the list and display it.
On Android devices the app will display a notification in the notification area when there are new notifications for Notify Me.
On a large device the details for a notification will be displayed on the right hand side when selecting a notification. Each notification type has its own layout, in general the notification has the following information areas.

Notification type and Id is displayed in a green area, on the right hand side in the same field the status of the notification is displayed
Contacts, if there is contact information such as email and phone number these will be displayed as icons and you can click on for example an email icon and a mail app is started
General information, state, date, amount etc.
Details, are normally displayed in a table, the table can be scrolled horizontally
Actions, Approve, Authorize etc. all actions except Follow up will set the notification to Ok unless there is an error. Follow Up will create a Task in IFS Applications with a link to the notification in IEE.
By swiping left or right on the details page you get to the next or previous notification in the list