This document describes how to set up your Demand Plan Server, Client and how to prepare your system to support a successful installation.
Note: When installing the Demand Plan Server and running it for the first time it can be easier to run it as an application the first time. When everything is configured and ready, you can set it to run as a service if you want, or it can continue to run as a application.
Note: When using remote access software such as Microsoft's Remote Desktop Client or Terminal Server Client to remotely access the desktop of the Demand Plan server PC multiple sessions will be started on the target PC. This may result in multiple running instances of the Demand Plan server, a condition that will render the Demand Plan server inoperative. If the server hosting Demand Planning is running the Windows 2003 Server or newer operating system, it is possible to use the "/console" option of Microsoft's Remote Desktop Client to avoid this situation. Other remote access programs such as VNC that display an image of the server console are also acceptable. This problem is only valid when the Demand Plan Server is running as an application and not a service. Running it as a service is recommended during normal operation, after the initial implementation/test phase.
Certain systems and configurations must exist on your system prior to installation of IFS Demand Planning. Demand Planning Setup does not install or configure an IFS Applications database.
1. The database that Demand Planning will run against must already be set up and your site with data (transaction and inventory parts) must exist in the database.
2. Install Oracle Client software if this is not already installed. Configure a SQL*Net connection to the database you want to connect your Demand Planning Server. This must be done only on the computer where the Demand Plan Server is to be installed.
3. You can run the Demand Plan Server with the Appowner user, or you can use the Demand Planner service user, if you use this make sure that its granted access to all tables and views needed. There exists scripts to do this that is included in DEMAND (POST_Demand_DemandServerUser.sql)
4.
There exists
installation files for both the Demand Plan Client (SetupForecastClient.exe)
and Demand Plan Server (SetupForecastServer.exe)
Note: English language translation procedures have changed in Apps 7.5. If upgrading from a previous release, manually delete all *en.xml translation files.
You can run a demo version of IFS Demand Planning without any IFS Application
database. This feature is very useful when your only purpose is to run a demo of
IFS Demand Planning. If you are installing only a demo version of demand
planning you do not need to follow steps 1, 2, and 3. If you do not have
SQL*Net installed on your computer and only want the demo version of demand
planning, you must run a batch file that is located in your demand plan server
target directory. Additional information is in the section �To
make a stand-alone demo� at the end of this document.
Demand Planning Server executable is installed directly via the SetupForecastServer.exe installer. Launch the installer, SetupForecastServer.exe. Follow the onscreen instruction of the installer to complete the demand plan server installation.
Note: From IFS APP 9 the Demand Plan Server will only be available in 64 bit version.
If the Demand Server is going to be run without the use of the DB appowner, it will require an Oracle user with an appropriate permission to access the database. Only one such user per database is required. During the installation of IFS Applications, pre-defined Demand Planner service user with all the required permissions is created. Upon creation, this user is set to "locked� with the password "expired". Before running Demand Plan Server, make sure password has been re-set for this user account and account is in state "unlocked". The options available in "Solution Manager", "Users" window can be used to manage these user credentials.
When the server is started it automatically tries to find the latest version of data, it can be in Oracle or on a backup file. First it finds the latest backup file then it compares the date found on this file with the last time for a write-back to Oracle. The server selects the newest data and loads that data and starts the server. Searching for the latest backup file is done in the following way. The filename of latest backup file is written to Advance Demand Plan Server Settings. If this file exists it is selected, if not it searches the backup path and selects the newest file. The backup path is found in the Demand Planner\Demand Plan Server Setup in the scheduling tab, this is in IFS Applications Windows Client.
By adding command line parameters it is possible to force the server to start from Oracle or file or manually. Here are the commands.
| Command | Description |
|---|---|
| /r | Start the Server using the last restore file. |
| /r:filename | Start the Server using a specific restore file. |
| /o | Start Server using data found in Oracle. |
| /o:username/password@service | Start Server from oracle using username, password and service. |
| /m | Start the Server manually. Do not load from oracle or file. |
The Demand Plan Server can be started as an NT-Service as well as being started as a traditional program.
Using an NT-Service allows the server to be started automatically and restarted if it fails. The biggest problem with NT-Service is that network resources like disks are not available or accessible, when the service is started. Therefore SQL*Net has to be installed locally. All files needed by SQL*Net must exist on the local drive including TNSNAMES.ORA. Failure to locate any of the files locally results in the "ORA-1010" error message when the server is started.
WARNING: The server only keeps data in memory, if the power fails or the service is stopped accidentally, all changes done since last write back or backup will be lost. This makes it very difficult to do any manual actions against with the Demand Plan Server. Hence the usability / user options will be reduced.
One alternative to using an NT-Service is to start the server automatically by putting it in the startup folder found in the Windows start menu. Since the program is not started before the network disks are in place this eliminates the need for SQL*Net to be installed locally. The drawback is the server is not restarted automatically if it fails.
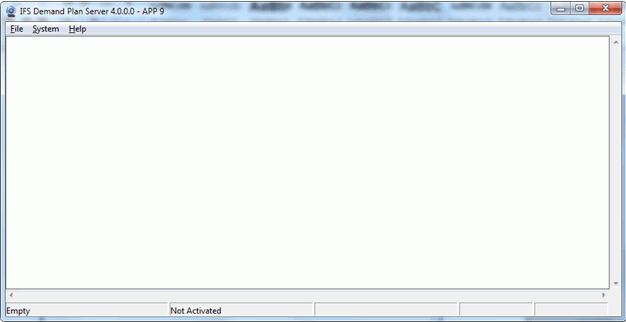
Note: If this menu shortcut is not available, just launch the Forecast Server from the Start -> Run menu or the command line with the /m parameter:� (Drive:\path\ForecastServer.exe /m)
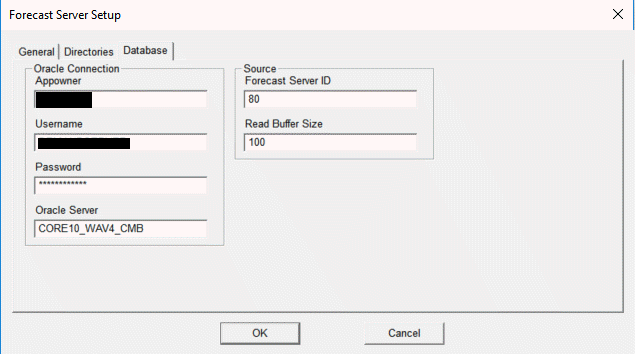
Now select the File-Setup menu. This opens the Forecast Server Setup window:

General Tab
Enable: Specify which parts of the server you want to activate.
Note: Do not change this without having installed the same database component. This parameter is set during installation and should not be changed after that.
Approve: When checked in a forecast part is automatically approved for
IPR calculations when you move to the next or close the DP client. For users
that do not have IPR leave this checked.
Client/Server Communication: Specify the port number used for Demand Plan
client and server communication. If this is changed be sure to use the same port
on the Client setup.
Windows Service: Specify if you want the Demand Plan Server to run as an
application (recommended to begin with), a manual service (you need to log on to
the host machine before it start up) or if you want it to run as a normal
windows service.
Log Directory: Specify the location of the server�s log files.
Language File: Specify the translation file for the language the server GUI will show when the server is started.
Help File URL: Specify the address for the server help start page called SfrmServerGUI.htm, here you must write the address of that page. This is only necessary if you want help to be available when you push F1 in the Demand Plan Server GUI.

Note: If you are only installing a demo of Demand Planning and are going to use a backup file as data for Demand Plan Server then you don�t need to fill in this tab.
Now it is time to load the server with some data. The easiest way of doing this is to load the test data set, which is distributed along with the installation. This data set can be useful for demo purposes and for testing that the server and client are setup correctly before you start to set up a demand plan server in IFS Applications (IFS Windows Client)
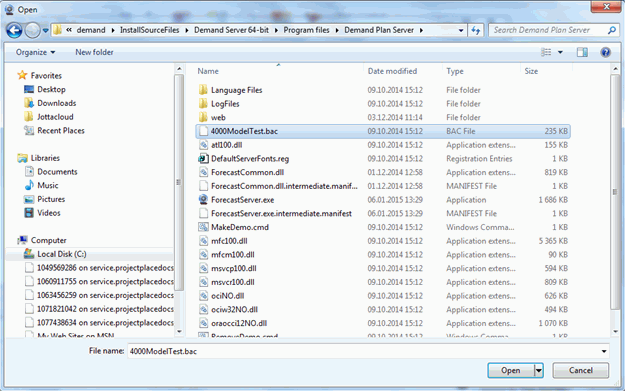
Now it is time to load the test data into the server, selecting File-Restore form the Server menu does this. Select the 4000ModelTest.bac file from the Open dialog and push the Open button.

![]()
Note: You will not be able to load data into the server when the test data is loaded
The Demand Plan Server can make forecasts for groups of parts. The predefined group fields are:
In addition to the predefined groups can be added by inserting records into
GROUP_FIELD_LIST_TAB. Group field list has the following fields:
| Field | Null | Type | Description |
|---|---|---|---|
| GROUP_ID | NOT NULL | VARCHAR2(3) | The group ID. Start with 100 to be sure not to crash with the new standard sets. |
| GROUP_NAME | NOT NULL | VARCHAR2(200) | Description of this group. |
| FIELD_NAME | NOT NULL | VARCHAR2(30) | The name of the field this group is take from. |
| FIELD_DESCRIPTION | NULL | VARCHAR2(200) | The name of the description of the group. |
| TABLE_NAME | NOT NULL | VARCHAR2(30) | The name of the table, this table must contain the fields CONTRACT, PART_NO and <field_name> |
| ROWVERSION | NOT NULL | DATE | Standard rowversion |
To clarify this, lets take an example: For some reason we want to group parts
by the unit code. We can use any GROUP_ID we want but to be sure we
do not crash with new standard ones we use 100. GROUP_NAME is the
name group it is displayed to the user. The unit code for each part is stored in
the table INVENTORY_PART_PUB. It is stored in the field
UNIT_MEAS. Description can be found by using the function
ISO_UNIT_API.Get_Description(UNIT_MEAS,NULL).
Unit measurement can be added by executing the statement:
INSERT INTO GROUP_FIELD_LIST_TAB(
	GROUP_ID, GROUP_NAME, FIELD_NAME, FIELD_DESCRIPTION,
	TABLE_NAME, ROWVERSION)
VALUES ('100', 'Unit Measurement', 'UNIT_MEAS',
	'ISO_UNIT_API.Get_Description (UNIT_MEAS,NULL) ',
	'INVENTORY_PART_PUB', SYSDATE);
There are three demand plan user roles, one called Demand_Plan_Role which is used for an ordinary demand users demand user. The second role is called Demand_Plan_Super which is used by the demand plan admin users and the third role is called Deman_Plan_Client which is used by users who wish to only have access to the Demand Plan Client. The difference of these roles is that the super users are allowed to change the setup parameters for the demand plan server, and set the user access to the different demand plan users both Demand_Plan_Role and Demand_Plan_Super users have access to IFS Applications Client and Demand Plan Client while the Deman_Plan_Client users only have access to the Demand Plan Client.
To install the roles use import method in IFS Deployment Administrator / Foundation 1 Administration / Security / Security Permissions and import the files DemandPlanRole.sql, DemandPlanSuper.sql and DemandPlanClient.sql, for the three roles. Then assign the roles to the different users.
There are two ways to connect to Demand Plan Server, either Direct or Through Aurena client. Field descriptions for Demand Plan Client login and setup dialogs can be found in below,

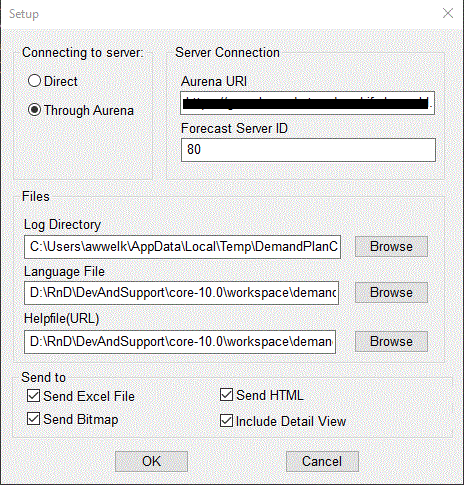
In the setup screen (File-Setup) you need to specify the IFS Cloud URI and which
Server ID you want to connect to. An example on an IFS Cloud URI is shown in the
figure below.

The IFS Cloud URI
When the URI and Server ID is filled in, click OK and simply log on with your IFS user name/password from the log on screen.

Login screen
To directly connect to the Demand Plan Server, the Sever Name
and Port should be specified
The Forecast Server is the name of the computer where the Demand Plan Server is running. This can also be an IP address. Remember that Win 2000 the computer names are case sensitive.
The Demand Plan Server Name is the
machine name where the demand plan server is running.
Port Number:
Specify the port number on which the server is listening. It must be the same
port number specified in the setup for the Demand Planning Server.
Note: Port 5000 is reserved on Windows XP for Microsoft Messenger. When running Demand Plan on XP, either choose a different port number or disable Microsoft Messenger.
Log Directory: Specify the directory location for the
log file.
Language File: Specify the language file to be
used by the Forecast Client.
Helpfile (URL): Specify the web
location for the client start help file. The start help file is called
CfrmDemandPlanClient.htm.
If help functionality on the client is not important then skip it. e.g.
C:\Documentation\DemandClient\CfrmDemandPlanClient.htm
Both Demand Plan Client and Demand Plan Server have different settings that can be set. When it comes to Demand Plan Server, part of these settings is stored in database and the rest can be found in the registry. Demand Plan Client settings are only stored in the registry. Normally there should not be any need for changing these values, but in some installations, there may be a need for such changes. For example, when the customer is using another period version than monthly then some best fit search parameters and season profile detection variables may be considered changed. For more information on how to change these parameters see the file SfrmRegistrySettings.htm.
When users don't have read or write access to the
HKEY_LOCAL_MACHINE
part of the registry then it is possible to set the Demand Plan Client to only
write to the HKEY_CURRENT_USER
portion of registry, avoiding this obstacle.
For details about these registry settings see the SfrmRegistrySettings.htm and the CfrmRegistrySettings.htm files in the demand documentation path, for the Demand Plan Server or the Demand Plan Client.
IFS EE Dashboard will only function if the Demand Plan Server Host machine is reachable from the Client's Machine.